
Welcome to stART! I hope that you will enjoy our story and art project and maybe even share your own too. All I ask is that you link back to A Mommy’s Adventures so that everyone can see all the other great projects that everyone shares too! The linky will be open all week.
I added a stART tab in my navigation bar to make it easier to search for past stART projects. Be sure to check it out!! All the books that we have read and did a stART project for are listed in alphabetical order.

This week we read One Bean, by Anne Rockwell. I have to admit that when I saw this book at the library I was drawn in by the cute cover and the excitement of planting our own bean seeds. When I opened the book I was not sure if it would hold Emily’s attention since there were a lot of words on each page, however I figured it was worth a try. I am SO glad that I did. Emily really enjoyed this book. It is a simple, yet informative book about planting for preschoolers. The illustrations are bright and simple, yet very accurate. This is a great book to go along with any planting unit especially planting beans!!
Emily and I planted beans in a egg carton container that Emily painted. We both agreed that this was the perfect project to go along with this book.

The book started with the description of a bean so I gave Emily one of our beans (I dried and saved them from last years bean plant). Emily enjoyed actually getting to touch and describe our bean too.

Emily sprayed a paper towel with water to get the beans ready to be planted just like in the book. This step helps the beans to sprout quicker, plus it was fun for Emily she loved using the spray bottle! All we did was wet the paper towel and then place the beans on it. Cover them and let them soak a bit. 
Now we were ready for our art project. To make the container for the beans we used an egg carton. I have seen this done many times before, but have never actually tried it myself. So I can’t wait to see what happens! First I cut the top off of the egg carton. We are going to use this as our holder, I figured it would collect any water that may seep through the egg carton. I gave Emily different colors of paint and let her cover the whole thing!
 We put the top part that Emily painted under the egg carton and then she filled up the egg cup part with soil.
Emily added one bean seed to each cup. 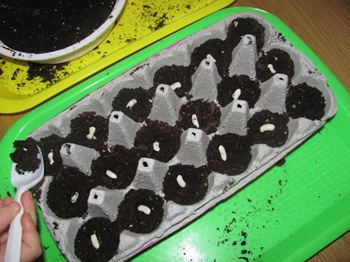
Then she covered them with some more soil.
 Finally she used the dropper to water each section. I think this was actually her favorite part!

Emily’s finished planter!!
***It seemed like most people liked the thumbnail linky, I was able to make the title a bit longer so I am going to give this a try. Let me know if this is better. I can’t wait to see all your great projects!!!


