Showing posts with label water colors. Show all posts

Thursday, March 20, 2014

Salad Spinner Art ~ 3D Spring Flowers

After the cold and snowy winter we have had here we are all so excited for the First Day of SPRING today.  To celebrate we had fun making this colorful 3 Dimensional Spring Flowers Project to brighten up the house.  The girls and I always love doing Salad Spinner projects.  It is so much fun to see the globs of paint spread out all over the paper.  When I was trying to think up a fun and different way to make flowers the salad spinner was the first thing that came to mind.  I absolutely LOVE how this project came out and the girls had so much fun working on it today!

Salad Spinner Art 3D Spring Flowers

For this project we used Water Color Paper, Blue Liquid Watercolors (these are my favorite paints!), Green Striped Plastic Drinking Straws, Cardstock and Washable Kids Paint.  You can use a Spin Art Set if you have one but we chose to use our Salad Spinner today.  I got mine at Ikea for $2.99 and it is amazing!

Salad Spinner Art 3D Spring Flowers First, I put a piece of watercolor paper on a backing tray, sprayed it with water to moisten it and then had the girls paint the whole piece with their blue liquid watercolors.

Salad Spinner Art 3D Spring Flowers Next, they took turns (since we only have one salad spinner) dropping slightly watered down paint onto a piece of paper at the bottom of the salad spinner.

IMG_6877 Once they were happy with how much paint they dropped onto the paper we put the top on and the girls spun away!

IMG_6880 I loved watching them help each other with this part.  They took turns holding the salad spinner down while the other spun it.

Salad Spinner Art 3D Spring Flowers Juliette checking to make sure it us just the way she wants it.

Salad Spinner Art 3D Spring Flowers After they made their spin art, I used a hair dryer to quickly dry the paint (the most amazing tip thanks to Jackie @ Happy Hooligans).  Then I traced around these flower cookie cutters we have and cut them out.

Salad Spinner Art 3D Spring Flowers

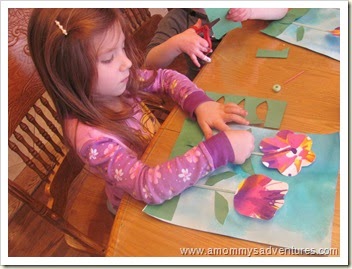
I had the girls trim the bottom off of one of the straw then I glued the flower onto the top part of a bendy straw, this way it could be moved all around and kind of sticks up from the paper to give it a more 3 dimensional effect.  Then we glued the whole straw onto the blue water colored paper.  (I did the gluing for this part since we were using a hot glue gun)

The girls cut fringe on a strip of green construction paper to add some grass and leaves to their flowers.

Salad Spinner Art 3D Spring Flowers We had so much fun working on this project, doesn't it get you so excited for SPRING!!

For another cute flower craft be sure to check out our Cupcake Liner Flowers.

This week I'm  linking up to:

 The Kids Co-Op, Show-and-Share Saturday, Link & Learn,  Share it Saturday, Mom's Library, The Sunday Showcase,  Tuesday Tots, Preschool Corner &5K, We Made That.


Follow our ADVENTURES on Facebook, Pinterest and Twitter!

Thursday, April 5, 2012

stART ~ What is Easter?

Welcome to stART!  I hope that you will enjoy our story and art project and maybe even share your own too. All I ask is that you link back to A Mommy’s Adventures somewhere in your post by either adding my button or a text link, so that others can see all the other great projects that everyone shares too! The linky will be open all week.  Be sure to stop by and visit the different links…every week there are so many different and fun book and craft ideas!

Check out the  stART tab in my navigation bar where you can find our past stART projects.  All the books that we have read and did a stART project for are listed in alphabetical order.  I have also included a list of all the blogs that participate in stART. 

image

We read What Is Easter?, by Michelle Medlock Adams last year and really enjoyed it again this year.  I love how it talks about all the fun things that kids enjoy doing for Easter, like going on Easter Egg Hunts, getting Easter candy, but then  explains what Easter is really about! 

This year I read this book to my Sunday School class, and it captured their attention the whole time I was reading it.  Each page asks a question like,“Is Easter all about Jelly Beans and Chocolate bunnies?” and they would shout “NO!!!”  It was so much fun to read to them.

The last page is my favorite part of this book:

Okay, now I get it.
The Easter Bunny is okay,
And Easter eggs are fun.
But Easter's not about that stuff.
It's all about God's son.

I read the last line slowly and by the time I got to “It’s all about…” they finished the last line for me.  Even though this is a board book a group of 2 year olds to 10 year olds loved it!
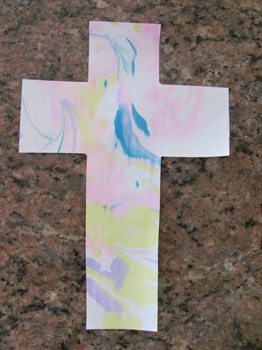
IMG_2214(Juliette’s Cross)

To go with this book Emily and Juliette made marbled crosses.  When I think of Easter my favorite tradition is the Living Cross that my church creates on Easter Sunday.  Every person in the congregation gets a fresh flower to stick into a huge cross that is covered in chicken wire.  Once we are finished, a dull wooden cross is blooming with new life!  Our marbled crosses reminded me of  the beautiful colors of the Living Cross we make on Easter Sunday!

IMG_2215(Emily’s Cross)

Unfortunately, I was not able to get pictures of the girls working on this project.  My nephew work up from his nap early and did not want to be put down.  So I had him in one arm and was helping them with the other.  No extra hands to take pictures :(

It was still very easy to do.  We sprayed some shaving cream into a layer onto a baking sheet.  Then the girls used droppers to add drops of liquid watercolors on top of the shaving cream. Next they used a craft stick to mix the colors into the shaving cream.  But, just a little bit, so that you can still see the individual colors.  Then they took the paper that I cut out in the shape of a cross and gently pressed it onto the shaving cream after a few seconds they pulled it up and used the craft stick to wipe off the extra shaving cream, this is the best part because it looks all white and plain and as you pull the craft stick down and the shaving cream comes of of the paper the vibrant swirls off color are revealed. 

Thing we learned while doing this:

Make sure you do not saturate the shaving cream.  The more shaving cream you use, the more paint you can use.  If you add to much paint the colors blend together and the liquid dissolves the shaving cream.

Do not mix to much, you just want to use the craft stick to swirl the colors around not mix them all together.

Have fun, and be sure to have an extra can of shaving cream the girls were really disappointed when we ran out!!!

Thursday, October 13, 2011

stART ~ Count Down to Fall

Welcome to stART!  I hope that you will enjoy our story and art project and maybe even share your own too. All I ask is that you link back to A Mommy’s Adventures somewhere in your post by either adding my button or a text link, so that others can see all the other great projects that everyone shares too! The linky will be open all week.  Be sure to stop by and visit the different links…every week there are so many different and fun book and craft ideas!

Check out the  stART tab in my navigation bar where you can find our past stART projects.  All the books that we have read and did a stART project for are listed in alphabetical order.  I have also included a list of all the blogs that participate in stART.  **This is a work in progress so if you have participated at least 3 times and would like to be added to the list, leave me a comment and let me know :0)

image

This week we enjoyed reading Count Down to Fall, by Fran Hawk.  The girls are starting to notice all the changes in nature as Fall has arrived.  They love pointing out the leaves that are changing  color and the acorns they find on the ground.  This book counts down many popular fall items with a fun to read rhyming text.  I love all of the details in the illustrations.  There is so much to talk about on each page.  Emily likes to know the names of certain flowers and trees.  So this book was great for teaching her the names of the different types of leaves that we are finding on the ground.   

When I saw the idea for this project on Superheroes and Princesses I knew it would go perfectly with this book.

For this project I cut out a maple leaf shape and an oak leaf shape on diffuser paper.  Then I used my hot glue gun to make the veins on the leaves.   Then I gave them to the girls to paint with red, orange and yellow liquid watercolors.

IMG_0393

IMG_0392 Emily and Juliette painting their fall leaves.

They had so much fun painting the leaves that I wished that I had made more of them to paint!

IMG_0479 IMG_0478

They look so pretty on our Sliding Glass Door, just like falling leaves!

Now it is your turn!! Click below to link up a book you read and the project or activity that you did to go with it.

Thursday, June 16, 2011

stART ~ Fidgety Fish

Welcome to stART! I hope that you will enjoy our story and art project and maybe even share your own too. All I ask is that you link back to A Mommy’s Adventures somewhere in your post by either adding my button or a text link, so that others can see all the other great projects that everyone shares too! The linky will be open all week.  Be sure to stop by and visit the different links…every week there are so many different and fun book and craft ideas!
Check out the  stART tab in my navigation bar where you can find our past stART projects.  All the books that we have read and did a stART project for are listed in alphabetical order.
image
This week we read Fidgety Fish, by Ruth Galloway.  Emily LOVES this book and asks for it all of the time.  It is a cute story about a little fish, Tiddler that just can’t stop moving.  His mother tells him to go out into the sea and use up all of his energy, but to stay away from the big fish.  Tiddler swims all around and sees all the different things in the ocean, jellyfish, starfish, and a great big “cave” to explore.  He swims right in and finds himself trapped in the belly of the big fish.  Just wait and see how he gets out!!
To go along with this book Emily drew a ocean scene on a piece of water color paper with oil pastels and then painted over the whole picture with blue liquid watercolor paint.
IMG_8235Emily’s Ocean Picture
I didn’t get any pictures of her working on this project since I was so busy watching her and talking about her picture, I totally forgot to take a picture of her working.  I can’t believe how much her confidence in drawing has improved.  She drew everything in this picture all by herself.  It is one of my favorite pieces of her art yet!

LinkWithin

Related Posts with Thumbnails