Thursday, March 20, 2014

Salad Spinner Art ~ 3D Spring Flowers

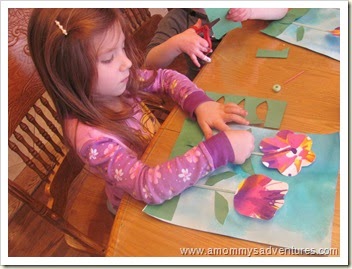
After the cold and snowy winter we have had here we are all so excited for the First Day of SPRING today.  To celebrate we had fun making this colorful 3 Dimensional Spring Flowers Project to brighten up the house.  The girls and I always love doing Salad Spinner projects.  It is so much fun to see the globs of paint spread out all over the paper.  When I was trying to think up a fun and different way to make flowers the salad spinner was the first thing that came to mind.  I absolutely LOVE how this project came out and the girls had so much fun working on it today!

Salad Spinner Art 3D Spring Flowers

For this project we used Water Color Paper, Blue Liquid Watercolors (these are my favorite paints!), Green Striped Plastic Drinking Straws, Cardstock and Washable Kids Paint.  You can use a Spin Art Set if you have one but we chose to use our Salad Spinner today.  I got mine at Ikea for $2.99 and it is amazing!

Salad Spinner Art 3D Spring Flowers First, I put a piece of watercolor paper on a backing tray, sprayed it with water to moisten it and then had the girls paint the whole piece with their blue liquid watercolors.

Salad Spinner Art 3D Spring Flowers Next, they took turns (since we only have one salad spinner) dropping slightly watered down paint onto a piece of paper at the bottom of the salad spinner.

IMG_6877 Once they were happy with how much paint they dropped onto the paper we put the top on and the girls spun away!

IMG_6880 I loved watching them help each other with this part.  They took turns holding the salad spinner down while the other spun it.

Salad Spinner Art 3D Spring Flowers Juliette checking to make sure it us just the way she wants it.

Salad Spinner Art 3D Spring Flowers After they made their spin art, I used a hair dryer to quickly dry the paint (the most amazing tip thanks to Jackie @ Happy Hooligans).  Then I traced around these flower cookie cutters we have and cut them out.

Salad Spinner Art 3D Spring Flowers

I had the girls trim the bottom off of one of the straw then I glued the flower onto the top part of a bendy straw, this way it could be moved all around and kind of sticks up from the paper to give it a more 3 dimensional effect.  Then we glued the whole straw onto the blue water colored paper.  (I did the gluing for this part since we were using a hot glue gun)

The girls cut fringe on a strip of green construction paper to add some grass and leaves to their flowers.

Salad Spinner Art 3D Spring Flowers We had so much fun working on this project, doesn't it get you so excited for SPRING!!

For another cute flower craft be sure to check out our Cupcake Liner Flowers.

This week I'm  linking up to:

 The Kids Co-Op, Show-and-Share Saturday, Link & Learn,  Share it Saturday, Mom's Library, The Sunday ShowcaseTuesday Tots, Preschool Corner &5K, We Made That.


Follow our ADVENTURES on Facebook, Pinterest and Twitter!

Monday, March 17, 2014

How to Catch a Leprechaun ~ Leprechaun Trap Attempt #3

We are at it again…this year we were sure that we were going to catch that tricky leprechaun. He was able escape from the first cake Leprechaun Trap and our Pulley Leprechaun Trap.  This year our trap had all the makings of a great trap with no way for that leprechaun to escape!!! How to catch a leprechaun supplies

We have been talking about different ideas for the leprechaun trap for awhile now.  We finally agreed that we would trick him into a large pot and then grease the sides so it would be to slippery for  him to climb out.

To accomplish this we needed:

  • Popsicle sticks
  • Tissue paper and streamers in rainbow colors
  • A large pot
  • Oil
  • Toothpicks
  • Paper
  • Markers
  • Play Dough

How to build a leprechaun trap  I used the hot glue gun to make the ladder so he could easily climb up to the top of the pot.  Next we set up popsicle sticks around the edge of the top of the pot hooping that they would make the rainbow tissue paper that we put on top of the pot slide in easier.  Finally, the girls put the strips of tissue paper and streamers over the top.

IMG_2821

The girls made some signs to show the leprechaun that there was a rainbow and gold up the ladder.  We hot glued them to toothpicks and poked them into green play dough.

IMG_2822

The gold coins on top, waiting for the leprechaun!

IMG_2817

The girls are so excited to see if they catch the leprechaun this time!!

How to build a leprechaun trap  IMG_2825That tricky leprechaun escaped again!!  This time he built his own ladder to climb out with the  popsicle sticks that fell into the pot.  At least he left us some fun treats for trying.

Happy St. Patrick’s Day!!!

Did you build a leprechaun trap this year? If you did add it to the linky so we can check it out.

Thursday, March 13, 2014

Custom Built in Bunk Beds ~ Built with Love By Daddy!!

  Emily and Juliette each had their own room until I was pregnant with Clara.  We only have 3 bedrooms in our house so we decided that Emily and Juliette would get to share a room.  Since the bedrooms in our house are pretty small the only option was a bunk bed.  I began scouring the internet and furniture stores for bunk beds, however I couldn’t find anything that I loved and when I did find something that I at least liked I was amazed at how expensive they were. 

During my search though I did find this amazing custom double built in bunk bed, from August Fields.  It had everything that I wanted, a little shelf for the girls to put their “treasures,” a light for reading and I loved that there where stairs instead of a ladder that stuck out into the middle of the room.  After shopping around with my husband one day I came home and showed him the Pinterest board that I had put together with different bunk bed ideas.  I thought he was going to tell me I was crazy, but instead he said “I could do that.”  (Definitely one of the great thing about being married to a contractor!!) We got to work planning them right away and as we were showing the girls what we were going to do they were beyond excited for their new Bunk Beds!!

Built in Bunk Beds

We were able to cathedral the ceilings in their room which was great because it made a small narrow room feel much bigger and we were able to make the bottom bunk bed higher so even my husband could sit in it and read with the girls without bumping his head. 

Built in Bunk Beds

The other really great thing is that the beds are actually built in to the studs in the walls so it is probably the strongest bunk bed ever.  My husband can sit up in the top bunk with the girls to read bedtime stories without any worries.  I thought that was important because Emily was so used to having us snuggle in her bed to read at night, I didn’t want her to miss out on that!

Built in Bunk Beds

I absolutely LOVE how their bunk beds came out!  Here you can see the steps leading up to the top bunk on the left hand side and they each have their own little  built in shelf to put their treasures on and their own reading light .

Built in Bunk Beds  Built in Bunk Beds I love that although they have to share a room, they each have their own special space in the room. 

Wednesday, March 12, 2014

Daisy Girl Scouts: Three Cheers For Animals Journey ~ Operation Happy Sock


My friend Sarah and I are Emily’s Daisy Girl Scout Troop leaders and we are currently working on the Three Cheers for Animals Journey.  When I found Operation Happy Sock on Pinterest I knew that this was the perfect service project for us.  A “Happy Sock” is simply a catnip toy made from a sock and they are super easy to make!  All you need is a sock, a handful of Poly-Fil and a pinch of Catnip.
Girl Scouts ThOperation Happy SockI had the girls bring in some of their mismatched or old socks (I have a mountain of them that were perfect for this) to the meeting.  We had a nice sized pile of old socks that we quickly turned into fun new toys for cats.
Girl Scouts Operation Happy Cat
To make a “Happy Sock” all you do is stuff a sock with the polyfil and a pinch of catnip.  Tie a knot at the ankle and you made a cute little cat some where very happy!!Operation Happy Sock The girls with all 52 of their “Happy Socks” they were so excited about this project!
This was such a fun project to work on and we can’t wait to donate them to our local animal shelter! 
I purchased the supplies that we used at Walmart and they were very inexpensive.  We only used a 1 oz bag of catnip and we still have most of a huge bag of polyfil leftover. 

Monday, March 10, 2014

Cooking with Kids ~ Apple Cinnamon Roll Ups

The girls and I love to cook and they are always helping me in the kitchen.  When children help in the kitchen they are learning so many important things and practicing so many different skills in a fun way, with a yummy reward at the end.  They get so excited to see what they were actually able to create and this recipe is fun because they get to do it mostly on their own. 

Apple Cinnamon Roll UpsAll you need to make these is a tube of crescent rolls, a slice of apple for each triangle and some cinnamon sugar.

Place the apple slice on a crescent roll dough triangle, sprinkle with some cinnamon sugar, roll up and bake at 350 degrees for about 10 minutes.

They are so yummy and fun to make too!!!

While making these the girls had to follow directions and use fine motor skills.

Sunday, March 9, 2014

Amazing Science ~ Absorption Color Mixing Color Wheel

I love science and color mixing, so when I saw the idea for this color mixing science experiment that demonstrated absorption I knew we had to try it.  These simple science experiments are a great way to get children of all different ages excited about science.

Green Absorption Experiment

The girls were amazed as the colored water slowly climbed up the paper towel and into the middle cup of plain water.  We went out for a little bit and as soon as we walked in the door they both ran to check it.  When they saw it they were bouncing up and down, “Mommy it’s green, the water turned green!”

To get them thinking we played around with adding more water to the colored cups and watching them water levels even out.

Color Mixing Absorption Experiment

A few days later I was thinking about this experiment and how cool it would look if we did it to make a color wheel.  I told the girls about it and they decided we needed to set it up RIGHT AWAY!!!

Absorption Color Wheel Experiment

The girls were able to see how the water was absorbed into the paper towel and then traveled up over into the cup of plain water creating the secondary colors. 

Absorption Science Experiment

I filled the cups of colored water higher than the cups of plain water.  The next time we try this I am not going to put any plain water into the cups so they can see what happens then.

Friday, March 7, 2014

Balloon Pit Sight Word Hunt


Juliette is so excited about learning how to read.  She is recognizing many different sight words so now I am looking for fun ways for her to practice them.  Balloon Pit Sight Word Hunt

We had a bunch of balloons leftover from Emily’s Lego Friends Birthday Party which I gathered into the corner to keep them away from Clara and that is when this idea came to me!  Since Juliette is an active child I knew she would love this fun way to hunt for her words.  I took 5 balloons and wrote one of the sight words we have been working with on each balloon.  Then I told her what word to find.  She loved pushing around all the balloons looking for the ones that had words on it, and she was even more excited when she found the word she was looking for!!  We will definitely be playing this gave many more times since it was a big hit.

Be sure to check out my Sight Word Board on Pinterest

What fun ways have you used to practice sight words with your children? 

If you have a post about sight words be sure to add it to the linky then check out the other great activities that have been linked up.   I can’t wait to check it out!!

LinkWithin

Related Posts with Thumbnails